The beauty of buying durable kitchen cabinets is that you can always repaint them when adapting to changing trends or when the existing paint chips or wears off. Repainting kitchen cabinets is a budget-friendly way to give your kitchen a fresh new look without entirely replacing them. But how do you do it?
Whatever method you choose for repainting, you always have to start by cleaning the cabinet surfaces and removing all knobs and hinges. Next, sand the dry surfaces to ensure proper paint adhesion and seal any exposed wood with a primer. Also, be sure to use filler material to repair any dents and scratches before repainting.
Here’s a more detailed guide on how to repaint cabinets, including how much paint you’ll need, DIY tips for achieving a professional finish, and the cost of hiring a professional.
Preparing to Repaint Your Kitchen Cabinets
You can only repaint cabinets after getting them back into great shape. The hardware and door hinges must be fully operational, and the cabinets must be free of mold, mildew, and grease.
If the cabinets are damaged or need repairs, it is important to fix them before painting. Otherwise, you may end up having to reface or replace them entirely. Find out more here: cabinet refacing vs. painting.
If the cabinets are in favorable condition for repainting, you’re in luck. That’s the most affordable way to give your kitchen a new look.
1. Gather Your Tools and Materials
- Paint (latex or oil-based.)
- Primer.
- Sandpaper (grit of 100 or higher.)
- Cleaning supplies (soap, water, and degreaser.)
- Painter’s tape.
- Drop cloths or plastic sheeting.
- Screwdriver for removing hardware.
- Filler material and putty knife.
- Paintbrushes (angled brush for corners and smaller areas, larger brush for flat surfaces.)
- Roller with a small nap for smooth surfaces or medium nap for textured surfaces.
2. Clear and Clean Your Cabinets
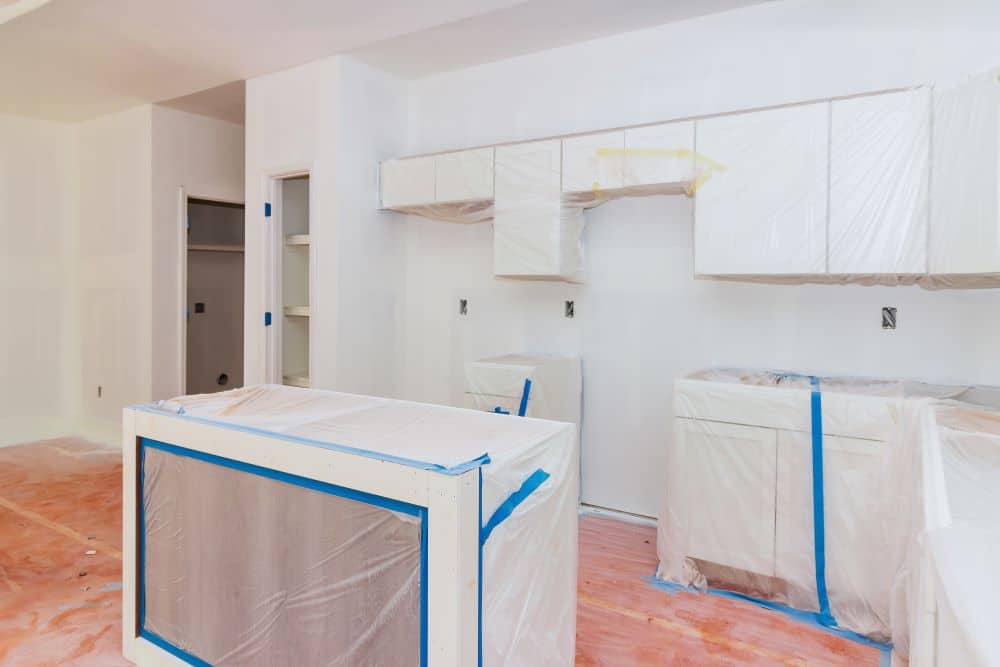
To begin the preparation process, clear the cabinets of all items and remove any hardware, including door handles, hinges, and knobs. Use painter’s tape to label each piece so you know where they go when it’s time to put them back.
Next, clean the cabinets thoroughly with soap, water, and degreaser. Paint can’t adhere to dirty or greasy surfaces, so clean all areas thoroughly.
It’s important to allow the cabinets to dry well because any moisture can affect the paint’s adherence and cause issues later.
3. Choose Your Paint
You want to ensure the paint is compatible with your cabinets’ material and type (e.g., wood, laminate, MDF).
Take your time deciding what color you want. You need enough time to pick a color that matches your kitchen’s overall design and ambiance.
Generally speaking, latex paints are more user-friendly for DIY projects than oil-based ones. They have lower volatile organic compounds (VOCs) levels and emit less odor.
On the other hand, oil-based paints provide a smoother finish but require longer drying times between coats.
4. Prepare Your Workspace
Drop cloths or plastic sheeting will help you prevent paint from falling and splattering on your floors and countertops. Painter’s tape is convenient for covering any areas or surfaces you don’t want painted, such as walls or backsplashes.
Be sure to properly ventilate the area! We recommend opening windows and doors coupled with fans to circulate air. It will help prevent any fumes from building up in the room.
The Step-by-Step Process to Repaint Kitchen Cabinets
1. Remove Cabinet Doors and Hardware
We already mentioned removing all hardware, such as door handles and hinges. After the preparation stage, the first step is to remove all the doors and drawers to avoid paint drips.
You want to get an even coat of paint, and the only way to do this is by individually painting these parts. Place them on drop cloths or plastic sheeting in a well-ventilated area when you work on them.
2. Sand Down Cabinets
Use sandpaper with a grit size of 100 or higher to roughen up the cabinet surfaces. This part of the process helps remove any existing finish by smoothing out scratches, chips, and bumps.
Once you finish sanding, wipe down the cabinets to remove all fine particles sanded from the cabinet surface with a tack cloth.
This step is necessary even if you’re using a chalk-based or no-sand primer, as it helps the paint adhere better. Sanding creates a smooth surface, making the finished product look professional.
3. Apply Primer
Priming helps to increase the bond between the cabinet materials and the top coat of paint. It also provides an excellent base for painting kitchen cabinets white.
Apply two primer coats, waiting for the first coat to dry before adding another. If you’re painting dark-colored cabinets white or any other light color, tint it gray so it’s easier to cover with fewer paint layers later.
Primers are available in oil and latex varieties, but we prefer an oil-based primer as it blocks stains and adheres better to metal hinges.
4. Start Painting
Once the primer dries, it’s time to start painting. Use a paintbrush or roller and smooth out any brush marks with a foam roller, depending on your preference.
If you’re using latex paint, thin it out with water before applying. If you’re using an oil-based paint, use mineral spirits instead.
Apply two coats of paint. The first coat should dry completely before adding another. Remember that thin layers are always better than thick ones as they prevent drips from forming.
Use a paintbrush to reach crevices or hard-to-reach areas and a roller for larger surfaces. Stroke the brush following the wood grain direction for a smooth finish.
5. Add Finishing Touches
After doing the coats one by one, it’s time to polish or add other preferred finishes before installing hardware or decorative elements.
Replacing old knobs and pulls with modern ones can give your cabinets a fresh look. You can also add molding or trim to create a more custom and high-end appearance.
Once everything is dry and all finishing touches are added, reinstall the cabinet doors and drawers using their original hardware or new pieces if desired.
Congratulations, you now have beautifully painted white kitchen cabinets!
How Much to Get Cabinets Repainted?
According to Forbes, the average cost of repainting kitchen cabinets in America is about $775 if you’re hiring a professional. If you’re planning on doing it yourself, the material cost can be as low as $200, depending on the type and quality of paint you choose.
That said, remember that this cost may vary depending on factors such as the size of your kitchen, the condition of your cabinets, and any additional work needed (such as repairs or sanding).
It also depends on whether you hire a professional or do it yourself.
Spray Painting vs. Brush/Roller Painting
Spray painting can give a smoother and professional finish, but it demands heavy equipment and can be messy. In consolation, spray paint will do the job much faster.
Brush/roller painting may take longer, but it is more budget-friendly and easier for beginners. DIY enthusiasts should avoid spray painting and stick with brush/roller painting.
However, hiring a professional specializing in spray painting may be worth it if you want a flawless finish and don’t mind the extra cost.
Do your research and choose a reputable company or individual. Also, read this guide: Should You Spray Paint or Hand Paint Kitchen Cabinets?
Find Out More on How to Repaint Cabinets
Numerous resources are available online if you’re looking for more detailed information on repainting cabinets. We already discussed how to paint melamine cabinets, but you may need help choosing colors.
Here are some timeless kitchen cabinet colors so you may find the perfect one for your kitchen. That way, you won’t have to repaint your cabinets as often as trends change.